
The Boxely UI Toolkit also supports collection binding, where you can bind a template (defined in a .box file) to an array of elements (defined in a JavaScript file). For example, you might use collection binding to populate a list of items in a scene, as shown in the following image.
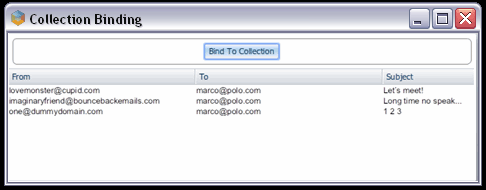
When the user clicks "Bind To Collection", the list of email items populates.
To implement this scenario, you must first create the element that will store the list in your .box file. Then, within that element, you must specify the binding rules that will bind the source data to each item in the list.
<?xml version="1.0" encoding="UTF-8"?>
<?import href="../../../../ocpSamples/theme/samples.box"?>

<window xmlns="http://www.aol.com/boxely/box.xsd"
    xmlns:s="http://www.aol.com/boxely/style.xsd"
    xmlns:on="http://www.aol.com/boxely/reaction.xsd" chromeless="true"
    id="window" translucent="false" s:height="470" s:width="650"
    s:mainWidth="500"  title="Databound List Population" resizable="true">

    <code id="main" language="jscript" src="DataBoundListSample.js"/>

  <vbox style="bordered">
    <hbox s:vAlign="center" s:hAlign="center">
      <button label="Bind To Collection" on:click="onBind();"/>
    </hbox>
  </vbox>

  <listBox id="listBox" s:flex="1" selectMode="multiple">
    <columns header="true">
      <column id="column1" name="From" s:minWidth="250"/>
      <column id="column2" name="To" s:minWidth="250"/>
      <column id="column3" name="Subject" s:flex="1"/>
    </columns>
    <rows id="myRows">
      <binding collectionSource="EMailItems" method="oneWay" replication="full">
        <template>
          <listItem style="rowContainer">
            <label s:fontFamily="Arial" value="{from}" />
            <label s:fontFamily="Arial" value="{to}" />
            <label s:fontFamily="Arial" value="{subject}" s:flex="1"/>
          </listItem>
        </template>
      </binding>
    </rows>
  </listBox>

</window>
In the above code, the bound element is a list of email items. Each item includes a "From", "To", and "Subject" field. At runtime, these items will display in an listBox containing three columns and an undefined number of rows. Within the rows element, the binding element connects the rows to the source object (in our case, a collection named "EmailItems"). The template element contained within the binding element associates data in the source object with the appropriate row container.
Once you've defined the bound element in the .box file that describes your scene, you can create the JavaScript code that describes the source element:
function myEmailItem()
{
  this.from = "";
  this.to = "";
  this.subject = "";
}

function onBind()
{
  var collection = null;
  collection = shell.serviceManager.basics.array;

  var emailItem1 = new myEmailItem();
  emailItem1.from = "lovemonster@cupid.com";
  emailItem1.to = "marco@polo.com";
  emailItem1.subject = "Let's meet!";
  collection.addValue(emailItem1);

  var emailItem2 = new myEmailItem();
  emailItem2.from = "imaginaryfriend@bouncebackemails.com";
  emailItem2.to = "marco@polo.com";
  emailItem2.subject = "Long time no speak...";
  collection.addValue(emailItem2);

  var emailItem3 = new myEmailItem();
  emailItem3.from = "one@dummydomain.com";
  emailItem3.to = "marco@polo.com";
  emailItem3.subject = "1 2 3";
  collection.addValue(emailItem3);

  scene.EMailItems = collection;
}
In the above code, the myEmailItem function defines the JavaScript object that represents an item in the collection. In the onBind function, we instantiate the myEmailItem object three times, adding it to our collection object (a basics.array). As our last step, we set a DOM object in the scene equal to the our collection object (the basics.array), which binds the data to the specified scene element.
Now that you've been introduced to data binding and collection binding, let's try it out in the "To-Do List" application. Proceed to the next section, "To-Do List" Übung 9.1: Datenbindung benutzen.